How to Make Freeze Dried Gummy Bears at Home Tips and Tricks?
Are you ready to discover the fun of making Freeze Dried Gummy Bears at home? These delightful treats have a unique texture and flavor. The process may seem complicated, but it's quite simple with a little guidance.
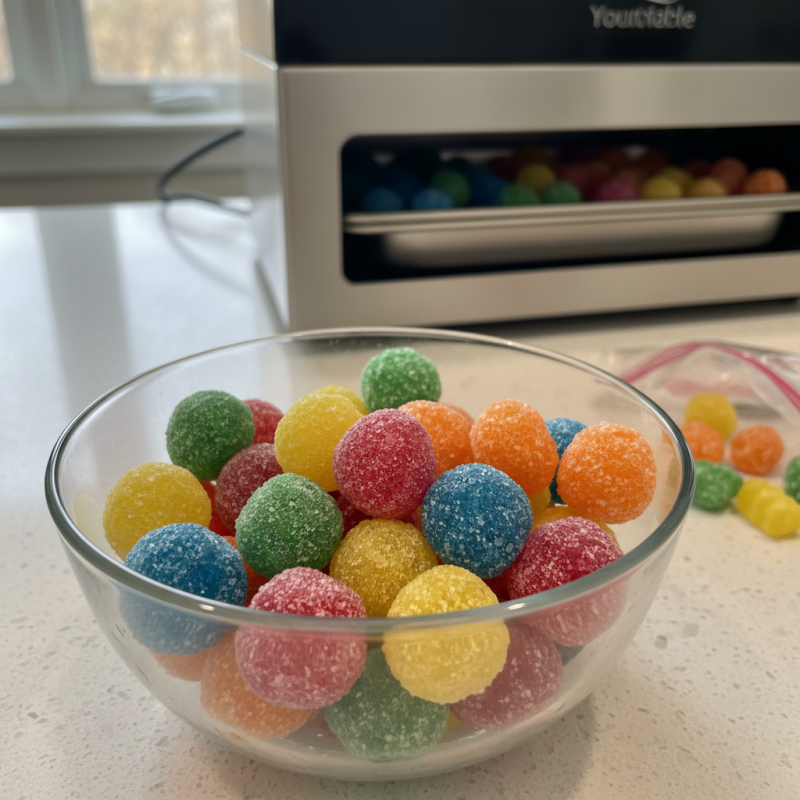
To start, you'll need gummy bears and a freeze dryer. The magic happens when the moisture is removed, leaving behind crunchy yet flavorful candies. You might face challenges along the way, like ensuring even drying. Check on your bears regularly. They may clump together, requiring careful separation.
As you embark on this sweet adventure, be prepared for some trial and error. The perfect freeze dried gummy bears can take a few tries. Don't let mistakes discourage you. Instead, see them as part of your culinary journey. Enjoy the process, and soon enough, you’ll have a stash of crispy gummy goodness ready to snack on!
Understanding Freeze-Drying and Its Benefits for Gummy Bears
Freeze-drying is a fascinating process. It removes moisture from food while preserving shape and nutrients. For gummy bears, freeze-drying enhances flavors and creates a unique texture. A study showed that freeze-dried snacks retain over over 90% of their nutrients compared to traditional dehydration methods.
Tips: Start with high-quality gummy bears. They should be fresh and have a good balance of sweetness and tartness. Cut them into smaller pieces for even drying. Monitor the freeze-drying process closely. Gummy bears can turn overly hard if dried too long.
Understanding freeze-drying can transform your snacks. This process involves three stages: freezing, primary drying, and secondary drying. Each stage is crucial. The temperature and pressure must be optimal. Failure to maintain these conditions can lead to poor results. Additionally, be aware that freeze-drying does not guarantee a longer shelf life. Always store your treats in airtight containers.
Tips: Experiment with different flavors and shapes. Not all gummy bears will have the same outcome. Keep notes on what works best. This can help refine your process. Don’t hesitate to try again if your first attempt isn’t perfect. The journey of learning through trial and error is valuable.
Choosing the Right Ingredients for Homemade Gummy Bears
When choosing ingredients for homemade gummy bears, think about texture and taste. Use gelatin as the base for that classic chewy feel. The quality of your gelatin matters. Look for options that provide the best results. The flavoring is equally important. Choose natural fruit juices for a fresher taste. Avoid overly sweet or artificial options.
Sugar balances the sourness of the fruit juice. Adjust the sweetness to your liking. You can also experiment with adding citric acid for a tangy kick. Be mindful; too much can overwhelm the flavor. For color, natural food dyes work well, but plain gummy bears are just as delightful.
Tips: Consider measuring small batches to perfect your recipe. It’s easier to adjust flavors in smaller amounts. Don’t hesitate to play with different combinations. Sometimes, they may not turn out as expected. It happens. Reflect on what could be improved next time.
Step-by-Step Guide to Preparing Gummy Bear Mixture
Making your own gummy bear mixture is a fun and rewarding experience. It’s essential to start with the right ingredients. You will need gelatin, water, sweeteners, and flavorings. The choice of flavor can vary widely. Think classic fruit tastes like strawberry or something more adventurous like cola.
Begin by sprinkling gelatin over cold water in a bowl. Let it sit for a few minutes to bloom. In a saucepan, heat the mixture gently until the gelatin dissolves completely. Be careful not to let it boil. Once dissolved, mix in your sweeteners and flavorings. You can taste the mixture to see if it suits your preference.
Pour the mixture into gummy bear molds. It can be a bit messy, so use a syringe or dropper for precision. Let the molds sit for at least an hour to set. You may face some challenges during this process. Sometimes the mixture won't set properly. If it’s too runny, it might need more gelatin. Don't be discouraged—experimenting is key.
The Process of Freeze-Drying Gummy Bears at Home
Freeze-drying gummy bears at home can be an exciting adventure. To begin the process, you need a freeze-dryer. This machine removes moisture while preserving texture and flavor. If you don’t have one, you might need to reconsider this project.
Next, prepare the gummy bears. Arrange them in a single layer on the drying trays. Make sure they are not touching. This step is crucial for even drying. Space them out for best results. It can be frustrating if they clump together. Your homemade gummy bears might not turn out as expected. Remember, patience is key here.
Once everything is in place, set the freeze-dryer to the appropriate setting. It will take several hours. During this time, don’t open the machine. Every time you do, it disrupts the process. After the drying cycle, check for the right texture. They should be light and crunchy, not tough. If they are still chewy, put them back in the machine. Adjustments may be needed, and it’s all part of the learning experience. Expect some trial and error—it's a part of home experimentation.
Tips for Storing and Enjoying Your Freeze-Dried Gummy Bears
When it comes to storing your freeze-dried gummy bears, proper preservation is key. A study from the National Institute of Food Technology suggests that freeze-dried products can last up to 25 years when vacuum-sealed. That's impressive! Use airtight containers to keep moisture out. This helps maintain the texture and flavor. Mylar bags with oxygen absorbers are also effective for extended storage.
For enjoying these delightful snacks, consider rehydrating them. A quick soak in water can restore some chewiness. Alternatively, sprinkle them on yogurt or incorporate them into desserts. Data from the Journal of Food Quality indicates that freeze-dried snacks retain about 97% of their nutrients. This means you can have a healthy indulgence without guilt.
However, not all gummy bears freeze-dry well. Some brands may result in a less-than-satisfactory texture. Taking the time to experiment with various recipes can yield the best results. Don't forget to note what works and what doesn't. Keeping a journal of your attempts can help refine the process. Enjoy the journey of making and tasting these treats!